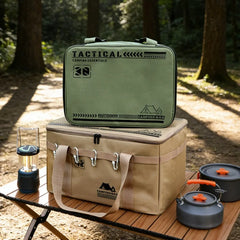
Camp Kitchen Repairs You Can Do Yourself: Latches, Hinges, Legs, and Pumps

Almost every camp kitchen that gets retired early dies from a five-dollar part: a latch that stopped snapping shut, a hinge screw that backed out, a leg that wobbles like a bad shopping cart. The case itself almost never fails first — which means most "broken" camp kitchens are one short bench session away from years more of trips.
Why Hardware Fails First (and Why That Is Good News)
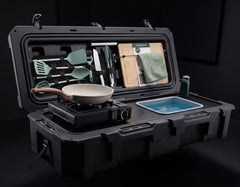
A camp kitchen packs more moving parts into one box than any other piece of camping gear. A complete kit bundles a stove, a sink, a rechargeable faucet, a water tank, and dozens of smaller items into a single case — here is everything a full camp kitchen kit includes — and every one of those trips means latches snapping, the lid swinging on its hinges, and legs folding out and locking. Each cycle is a little bit of wear. The stove burners and the steel case shrug off a decade of use; the hardware that moves is what loosens, bends, and eventually breaks.
The encouraging part: latches, hinges, and folding legs are commodity hardware, not proprietary electronics. The outdoor industry treats them as consumables — stove maker Camp Chef runs a replacement-parts store that sells legs in sets of four, control knobs, and full repair kits, and generic draw latches and piano hinges hang on the shelf of any hardware store. An all-in-one box like the VOZ Camp Kitchen concentrates the four common failure points — latches, hinges, folding legs, and the faucet pump — in one place, so one small parts pouch covers your entire outdoor kitchen.


Latches: Tighten, Realign, or Replace
A latch that will not hold is the most common camp kitchen complaint, and it fails in three escalating stages. Work through them in order:
- Loose mounting screws. Vibration on washboard roads backs screws out. Snug them with a hand screwdriver — not a drill, which strips small hardware. If a screw spins freely, swap it for one a size longer or thicker in stainless steel.
- Bent hook or strike. If the latch closes but pops open, the hook or the strike plate it grabs has usually bent outward. Squeeze the hook back into shape with pliers a millimeter at a time, testing the snap after each adjustment. Over-closing a draw latch so it strains at full tension will bend it again — you want firm contact, not maximum force.
- Broken spring or cracked body. Replace the whole latch. They are sold as "draw latches" or "toolbox latches" in stainless or zinc-plated steel; match the hole spacing of your old one, or drill fresh holes and leave the old ones.
If your latch is riveted on rather than screwed, replacement is still a driveway job. Punch a small dent in the center of each rivet head so the bit does not wander, drill with a bit slightly smaller than the rivet head until the head pops off, then push the stems through. Mount the new latch with small machine screws backed by washers and locknuts — a #6-32 round-head screw is a common size for case hardware, and locknuts will not rattle loose the way the original rivets eventually did.

Hinges: Squeaks, Sag, and Stripped Screws
Hinges announce their problems early. A squeak or a gritty feel means the pin is running dry; a lid that shifts sideways means mounting screws are loosening; a lid that droops means the hinge itself is worn or the screw holes are stripped.
For lubrication, use the right product for the location. White lithium grease is the pick for exposed metal hinges and latches — it is thicker than spray silicone, clings to metal through rain, and doubles as rust protection. Silicone spray is the better choice near food-prep surfaces, plastic parts, and rubber seals: it dries clean, does not attract dust, and will not stain — it just needs reapplying more often. Wipe off any excess either way; a camp kitchen lid sits inches from your cutting board.
Stripped screw holes in a wood-bodied chuck box have a classic fix: coat a few matchsticks or toothpicks in PVA wood glue, pack them into the hole, let the glue cure, and re-drive the original screw into the now-smaller hole. In a metal or composite case, step up one screw diameter or switch to a machine screw with a locknut on the far side.
If a long lid keeps sagging no matter how often you tighten it, upgrade to a piano hinge (also called a continuous hinge). Because it runs the full width of the lid, it spreads the load across dozens of screws instead of six, which is why purpose-built chuck boxes use them from the factory.
Legs: Wobble, Stripped Threads, and Locks That Will Not Catch
A wobbly leg is rarely a broken leg. Start with the fasteners: check every bolt and screw where the leg meets its bracket and where the bracket meets the case, and snug each one. Stop at snug — overtightening folding-leg hardware makes the legs hard to fold and can warp the bracket. Then confirm every leg is fully extended and each locking mechanism engages with a positive click before you load the kitchen; a half-engaged lock is the most common "wobble" that owners misdiagnose as bent metal.
When a leg genuinely is bent, replace it rather than straightening it repeatedly — re-bending work-hardens aluminum tubing until it cracks. Replacement legs are easy to source: Camp Chef sells them in sets of four for its cooking systems, and generic threaded and slip-in legs are stocked by hardware suppliers. Finally, check the feet. A missing rubber foot drops one corner about a quarter inch, which reads as "wobbly table" but costs a dollar to fix.

The USB Faucet Pump: It Is Almost Always the Battery or the Tube
The rechargeable faucet is the one piece of a modern camp kitchen with electronics in it, and owners tend to assume a dead pump means a dead unit. Usually it does not. Run through this checklist before you shop for a replacement:
- Pump will not run at all. Charge it fully first. Lithium batteries ship at roughly 30–40% charge for transport safety, and skipping the initial full charge — typically one to two hours over USB — is the single most common cause of "dead on arrival" complaints.
- Pump will not run while plugged in. That is by design on most models: the pump is disabled during charging as a safety measure. Unplug the cable and try again.
- Weak or slow flow. Two suspects: a battery below roughly 20% charge, or a kinked or clogged silicone intake tube. Charge fully, then check that the tube runs straight and flush it clean — mineral scale and food debris narrow it over time.
- Battery is wearing out. When a pump that used to run for days now quits mid-weekend, feels hot while charging, or the body looks swollen, the battery is done. On sealed units, that means replacing the pump head.
The good news is that the pump is the cheapest "major component" on the whole kitchen. Swap-in USB pumps and faucet heads cost about as much as a tank of propane, and the water tank, sink, and case around them keep working through several pump lifetimes.


FAQ
What belongs in a camp kitchen field repair kit?
A pouch the size of a sandwich bag covers nearly everything in this article: a multi-tool with pliers, a screwdriver with a few bits, a dozen spare stainless screws with washers and locknuts, one spare draw latch, zip ties, a roll of strong cloth tape, and a small tube of white lithium grease or a silicone wipe. Total weight is under a pound, and it lives happily in one of the kitchen's storage bins.
When is repair no longer worth it?
Hardware is always worth fixing; structure usually is not. A cracked case shell, a warped lid that no longer seals, or rust that has perforated the metal all compromise the box itself, and replacement hardware cannot bring back a failed frame. If the case is sound, fix on — hardware repairs are cheap, fast, and repeatable.
Are camp kitchen parts standardized?
The wear parts mostly are. Draw latches, butt hinges, piano hinges, machine screws, and rubber feet are generic hardware-store items sized in standard increments, which is exactly why this kind of repair is a driveway job. The main exceptions are molded plastic brackets and proprietary leg fittings on some boxes — for those, check whether the maker sells replacements before improvising.
How do I prevent most of these repairs?
Three habits cover it: rinse and fully dry the box after trips so grit and moisture never sit on the hardware, lubricate hinges and latches at the start of each season, and do a two-minute screw check — every fastener, snug but not cranked — before the first trip of the year. Loose hardware is the seed of almost every failure above.
- Camp Kitchen Kit: Everything That's Included (and Why It Matters)
- How Long Does a Camp Kitchen Last? Lifespan and What Wears Out First
- How a USB-Rechargeable Faucet Works on a Camp Kitchen
- How to Keep a Camp Kitchen From Rusting: Weatherproofing That Actually Works
- How to Clean Your Camp Kitchen After a Trip (So It Lasts for Years)
Ready to upgrade your camp kitchen?
The VOZ Camp Kitchen includes everything you need in one weatherproof case. Sets up in 15 seconds.
Shop VOZ Camp Kitchen →